First Time Login
Getting Started with PHOX
Learn how to access and navigate the PHOX system for the first time. This workflow covers logging into the system, selecting your pharmacy, searching for patients, accessing the patient 360° view, and using communication features like RingCentral integration.
Key Objectives
- Successfully log into PHOX system
- Select GreenShield Pharmacy
- Search and find patients
- Access patient 360° view
- Use RingCentral communication features
Time Required
Approximately 5 minutes to complete all steps
Interactive Tutorial
Video Walkthrough
Step-by-Step Instructions
1Navigate to PHOX System
Open Google Chrome and navigate to https://gsp.phox.app/
2Login to PHOX
Enter your username and password, then click "Log In"
3Select Pharmacy
Select "GreenShield Pharmacy" from the pharmacy dropdown menu
4Navigate to Patients
Click "Patients" in the navigation menu to access patient records
5Search for Patients
Use the search field to find patients by last name, first name, or both
6Access Patient 360° View
Click "View 360°" button to see comprehensive patient information
Frequently Asked Questions
What browser should I use for PHOX?
Google Chrome is the recommended browser for PHOX. It provides the best compatibility with all system features, especially the RingCentral integration.
How do I switch between pharmacies?
After logging in, you can select the pharmacy from the dropdown menu. Always ensure you've selected "GreenShield Pharmacy" or the appropriate pharmacy for your work.
What is the Patient 360° view?
The Patient 360° view provides a comprehensive dashboard showing all relevant patient information in one place, including active medications, coverage details, and contact information.
Create Subscription
Creating New Subscriptions
Learn how to create a new subscription order in PHOX. This workflow covers selecting a patient from the To-Do Report, entering medication details, setting the delivery schedule, and initializing the subscription.
Key Steps
- Access To-Do Report for pending subscriptions
- Select patient and create order
- Configure medication and delivery details
- Validate delivery address
- Submit to billing queue
Important Notes
Always validate delivery addresses before creating subscriptions. Invalid addresses will prevent order creation and may delay patient medication delivery.
Interactive Tutorial
Video Walkthrough
Step-by-Step Instructions
1Access To-Do Report
Navigate to Subscriptions menu and click "To-Do Report" to see patients due for subscription onboarding
2Select Patient & Create Order
Click on the patient row to open the Create Order dialog. Patient information auto-populates.
3Configure Subscription Details
Set medication quantity (e.g., 3 pens), days supply (typically 84 days), and delivery schedule
4Validate Delivery Address
Check address validation status. If invalid, click validation warning and use Google Maps integration
5Create Subscription Order
Review all details and click "Create Subscription Order". Order saves with DRAFT status in billing queue
Frequently Asked Questions
What happens after I create the subscription?
After creation, the order appears in the Billing Dashboard with DRAFT status. The billing team will process it through Croll, assign an RX number, and trigger the SMS notification to the patient.
What does "Bill" or "DL" mean in the To-Do Report?
"Bill" means the prescription needs to be billed through Croll. "DL" means already billed, so skip the billing step.
What happens if a patient has a copay?
Orders with copays are routed to the AR Dashboard until payment is resolved. The patient won't receive confirmation SMS until the copay is dealt with.
SMS Capture Form
Use this form to capture SMS consent and patient information.
In-App Feedback
Providing Feedback in PHOX
Learn how to provide feedback directly within the PHOX application. This workflow guides you through accessing the feedback feature, navigating to help articles and documentation, and submitting feedback to improve the system.
Key Features
- Access in-app help and support options
- Navigate to Documentation & Help Articles
- View Frequently Asked Questions (FAQs)
- Submit feedback for system improvements
- Report issues or suggest enhancements
Time Required
Approximately 2-3 minutes to submit feedback
Important Notes
Your feedback is valuable for improving the PHOX system. Be specific about issues you encounter or features you'd like to see. Include screenshots when possible to help our team understand your suggestions better.
Interactive Tutorial
Step-by-Step Instructions
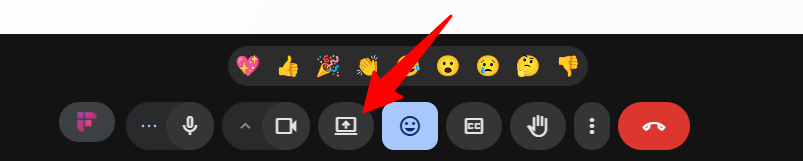
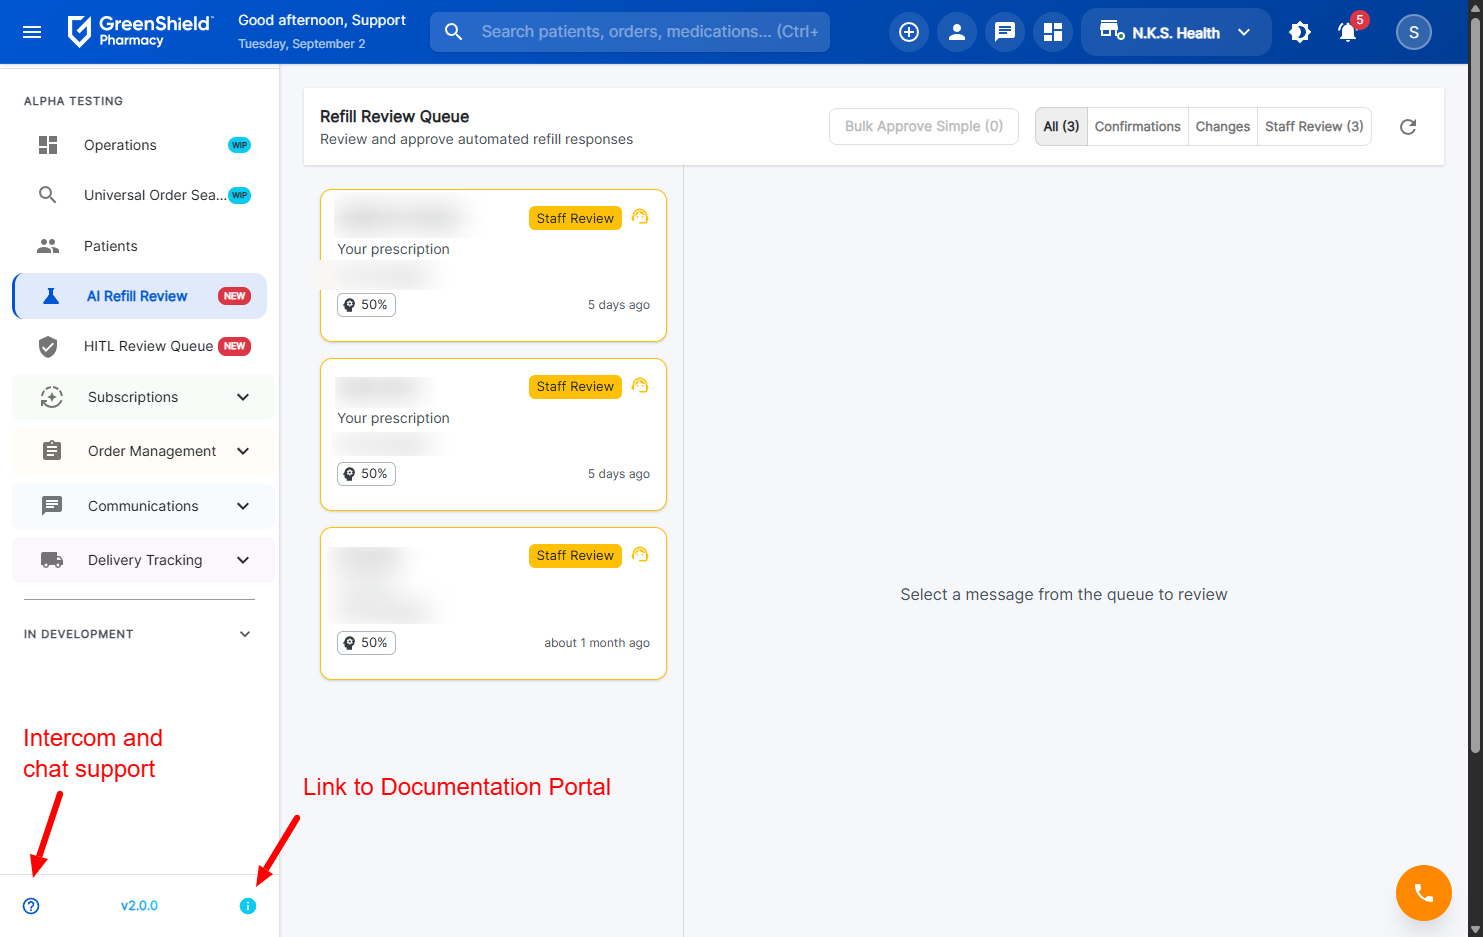
1Access Help Menu
Click on the help or support icon in the PHOX application header or navigation menu
2Navigate Through Options
Browse through the available help options including documentation, tutorials, and FAQs
3Access Documentation & Help Articles
Click on "Documentation & Help Articles" to view comprehensive guides and resources
4View FAQs
Navigate to the FAQs section to find answers to commonly asked questions
5Submit Feedback
Use the feedback form to provide suggestions, report issues, or request new features
6Include Details
Provide specific details about your feedback including steps to reproduce issues if applicable
7Attach Screenshots
If relevant, attach screenshots to help illustrate your feedback or issue
8Submit and Close
Click submit to send your feedback, then close the feedback window to return to your work
Frequently Asked Questions
How often should I provide feedback?
Provide feedback whenever you encounter an issue, have a suggestion for improvement, or notice something that could work better. Regular feedback helps us continuously improve the PHOX system.
What types of feedback are most helpful?
The most helpful feedback includes:
- Specific descriptions of issues or bugs
- Steps to reproduce problems
- Suggestions for workflow improvements
- Feature requests based on daily tasks
- User interface enhancement ideas
How long does it take to get a response?
Our team reviews all feedback regularly. Critical issues are addressed immediately, while feature requests and enhancements are evaluated and prioritized based on user needs and system requirements. You can expect acknowledgment within 24-48 hours for urgent issues.
Can I track the status of my feedback?
Yes, when you submit feedback through the system, you'll receive a reference number. You can use this to follow up on the status of your submission or check for updates in the help section.
What if I need immediate assistance?
For urgent issues that prevent you from completing your work, use the "Report Critical Issue" option in the feedback form, or contact your supervisor or IT support directly. Critical issues are prioritized and addressed as quickly as possible.
Happy Path - Complete End-to-End Workflow
Complete Order to Delivery Workflow
The Happy Path workflow represents the ideal, complete end-to-end process for handling a patient prescription from initial creation through delivery. This comprehensive workflow covers subscription creation, billing, patient confirmation, clinical verification, packaging, product verification, and delivery scheduling.
Workflow Stages
- Stage 1: Subscription Creation & Drug Selection
- Stage 2: Address Validation & Delivery Scheduling
- Stage 3: Billing Processing & RX Number Assignment
- Stage 4: SMS Notification & Patient Confirmation
- Stage 5: Clinical Verification & Signature
- Stage 6: Packaging & Product Verification
- Stage 7: Delivery Scheduling & Route Assignment
Key Requirements
- Patient must be selected from the Todo Report
- Valid and verified delivery address required
- RX number must be obtained from Kroll
- Phone number must be whitelisted for SMS testing
- Clinical verification requires pharmacist signature
- Product barcode scan for verification
- Delivery date must be confirmed with patient
Time Estimate
Complete workflow typically takes 15-20 minutes per order when all steps are completed sequentially.
Interactive Walkthrough
Scrollable Step-by-Step Guide
Video Walkthrough
Complete Step-by-Step Process
📋 Stage 1: Subscription Creation
1Access Todo Report
Navigate to the Todo Report in the system. This contains patients ready for subscription setup.
2Select Patient & Drug
Click on a patient from the Todo Report. Select the appropriate drug for the subscription and click "Continue".
3Validate Delivery Address
Check if the patient's address is validated. If not, click the edit address dialog and validate through the system. Click "Save Address" then "Accept & Save".
4Schedule Delivery Date
Select the delivery date (e.g., Monday, September 15). Click "Continue to Review".
5Create Subscription Order
Review all details and click "Create Subscription Order". The order is now created in DRAFT status.
💳 Stage 2: Billing Process
6Access Billing Dashboard
Click on the order number to copy the RX number. Navigate to "Process Billing".
7Assign RX Number
Paste the RX number into "New RX Number (from Kroll)" field. Copy the medication details for reference.
8Configure SMS Template
Enter the phone number (must be whitelisted for testing). The system will prepare the SMS notification with prescription details and delivery date.
9Send SMS Notification
Click to send the SMS. Patient receives: "Hi [Name], Your prescription (RX#[NUMBER]) ready for [Date] delivery to [Address]. Reply YES to confirm or NO to change."
📱 Stage 3: Patient Confirmation
10Check Refill Management
Navigate to "Refill Management" to verify the SMS was sent. Click "View Details" then "Order Lifecycle".
11Review SMS Thread
Access RingCentral integration to view the SMS conversation and confirm message delivery.
12Process Patient Response
If patient responds YES: Navigate to HITL Review Queue. Click "Modify" to customize the response if needed (e.g., "It will be delivered on Monday, September 15"). Click "Send Modified Response".
13Instant Confirmation
Navigate to "Pending Confirmations", refresh, and use "TEST: Instant Confirm YES & Create Descartes Shipment" for immediate processing.
✅ Stage 4: Clinical Verification
14Access Order Management
Go to "Order Management" > "All Orders" > "Verify Clinical".
15Perform Clinical Checks
Click "Verify" and review all clinical parameters. Check each verification box for drug interactions, dosage, and patient history.
16Sign Verification
Enter pharmacist signature in the designated field. Click "Sign & Save" then "Complete Verification".
📦 Stage 5: Packaging
17Navigate to Package Queue
Go to "All Orders" > "Package". Select the order for packaging.
18Complete Packaging
Enter packaging details including lot numbers and expiry dates. Add any special handling instructions. Click "Complete Packaging".
🔍 Stage 6: Product Verification
19Access Product Verification
Navigate to "Product Verification" and click "Verify this product".
20Confirm Product Details
Select "Confirmed" and "All Correct". Scan or enter the product barcode for tracking.
21Final Pharmacist Check
Enter pharmacist name who performed the final verification. Click "Complete Verification".
🚚 Stage 7: Delivery Scheduling
22Schedule Final Delivery
Navigate to "Schedule Delivery". Open the date picker and confirm the delivery date matches patient confirmation.
23Assign to Route
Click "Schedule Delivery" to assign the order to the appropriate delivery route based on the address zone.
24Complete Workflow
Return to "Pipeline View" to see the order has moved through all stages. The order is now ready for delivery on the scheduled date.
Frequently Asked Questions
What happens if a patient doesn't respond to the SMS?
If no response is received within 24 hours, the order stays in "Pending Confirmation" status. The system can be configured to send reminder messages or escalate to phone call follow-up. Orders without confirmation cannot proceed to delivery scheduling.
Can I modify the delivery date after patient confirmation?
Yes, but it requires sending a new SMS notification to the patient and obtaining fresh confirmation. Navigate to the order details and use the "Reschedule Delivery" option, which will trigger a new confirmation cycle.
What if address validation fails?
Failed address validation prevents order creation. You must either:
- Manually correct the address using Google Maps integration
- Contact the patient to verify correct address details
- Use the address override with supervisor approval if validation system error is suspected
How do I handle orders with copayments?
Orders with copayments are automatically routed to the AR Dashboard after billing. They remain on hold until payment is processed. The patient confirmation SMS is only sent after copayment resolution. Payment can be collected via phone, online portal, or at delivery.
What's the difference between pipeline and table view?
Pipeline View: Shows orders organized by workflow stage (visual kanban board). Best for seeing workflow bottlenecks and order progression.
Table View: Traditional list format with sortable columns. Better for bulk operations, filtering, and detailed order searches.
Can multiple orders be processed simultaneously?
Yes, the system supports batch processing at certain stages:
- Billing: Up to 10 orders can be billed together
- SMS Notifications: Bulk send available for confirmed addresses
- Clinical Verification: Must be done individually for safety
- Delivery Scheduling: Batch scheduling by delivery zone supported
What triggers the Descartes integration?
Descartes integration activates when:
- Patient confirms delivery via SMS (YES response)
- Manual confirmation through "Instant Confirm" button
- Batch delivery scheduling for confirmed orders
How long is an RX number valid?
RX numbers from Kroll are valid for the prescription duration (typically 1 year or until refills exhausted). Each refill uses the same RX number. New prescriptions require new RX numbers. The system tracks remaining refills and alerts when renewal is needed.